
Gimp Tips - Hedcut
Here is a way to turn a photo into a Jornal-style hedcut. I was originally going to write all the steps out for you to follow, but I realized that it would make it easier for both you and me in the future to just make it into a script. So download that file, put it in share/gimp/2.0/scripts, and run Script-Fu|Matt|Hedcut. I'll walk you through some of the options here.
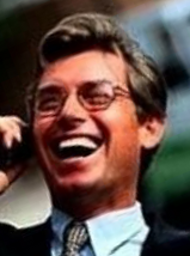 Let's begin with this happy guy. You may recognize him for his
love of business.
He's a little blurry at this size, but that's ok with this script.
Let's begin with this happy guy. You may recognize him for his
love of business.
He's a little blurry at this size, but that's ok with this script.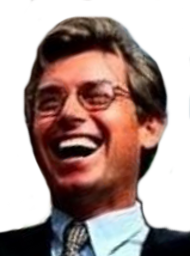 Before applying the script, I'll paint out the background with white.
You can leave the background in, but it's usually cleaner to remove it. I
took out his hand with the phone, too, to make it a nicer head shot.
Before applying the script, I'll paint out the background with white.
You can leave the background in, but it's usually cleaner to remove it. I
took out his hand with the phone, too, to make it a nicer head shot.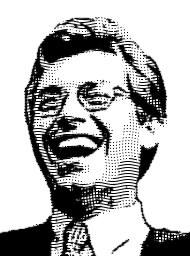 This is the result of running the script using the default settings.
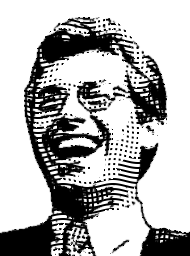 If you intent to make a low resolution image, the lines might blur
together. So you can change the first setting ("Approximate Number of
Lines") to a lower number. This is the number of wavy lines that would
fill the image from top to bottom. The number is approximate because some
rounding will take place.
If you intent to make a low resolution image, the lines might blur
together. So you can change the first setting ("Approximate Number of
Lines") to a lower number. This is the number of wavy lines that would
fill the image from top to bottom. The number is approximate because some
rounding will take place. The "Lightness Boost" parameter affects both lightness and contrast. Most
photos would produce uniform lines or dots across the whole face. This
boost ensures that there are white areas and good contrast. If you don't
get any open white areas, turn this up. If you get too little shading, turn
it down. Here's what it looks like with the lightness turned way down.
The "Lightness Boost" parameter affects both lightness and contrast. Most
photos would produce uniform lines or dots across the whole face. This
boost ensures that there are white areas and good contrast. If you don't
get any open white areas, turn this up. If you get too little shading, turn
it down. Here's what it looks like with the lightness turned way down. If you want to get only the dots and wavy lines, you can uncheck "Include
Outlines". You can then apply your own edge detection or photo-to-sketch
tricks if you want.
If you want to get only the dots and wavy lines, you can uncheck "Include
Outlines". You can then apply your own edge detection or photo-to-sketch
tricks if you want.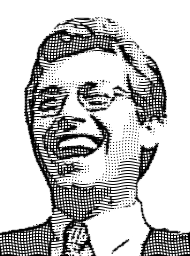 None of the remaining options are used unless you include outlines.
"Remove Black Areas" will attempt to not fill in large areas of black.
It makes it a little more sketch-like, but provides less contrast.
None of the remaining options are used unless you include outlines.
"Remove Black Areas" will attempt to not fill in large areas of black.
It makes it a little more sketch-like, but provides less contrast.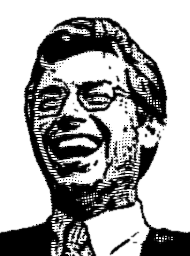 "Line Thickness" controls how thickly the outlines are drawn. "Line
Prominence" affects how many lines get drawn (and what sort of deatils will
get lines). Here it is with both turned way up.
"Line Thickness" controls how thickly the outlines are drawn. "Line
Prominence" affects how many lines get drawn (and what sort of deatils will
get lines). Here it is with both turned way up.