
Gimp Tips - Old Photo
This technique will make a photo look like it was taken during the World War II era or in the fifties. It's important to note that for this to really be effective the subject matter of the photo must also look like it is from that period. If there is anything in the picture, even something small, that distinctly looks like it is from 2004 (or 1984 for that matter) people will see it and know when the picture was taken, regardless of what you do to the image.
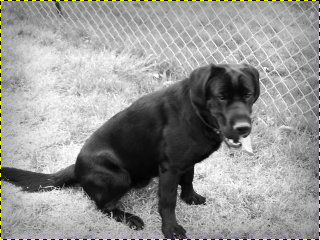
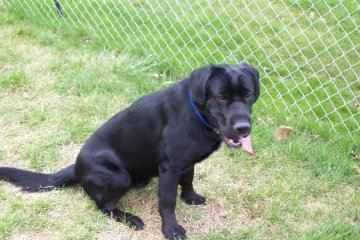 This is Casey. He's a good subject for this,
because the picture consists only of him, some grass, and a chain link
fence, all of which were commonplace back in the fifties, so nothing
looks out of place. I'm going to make this look like a picture of my
grandfather's dog, not mine.
This is Casey. He's a good subject for this,
because the picture consists only of him, some grass, and a chain link
fence, all of which were commonplace back in the fifties, so nothing
looks out of place. I'm going to make this look like a picture of my
grandfather's dog, not mine.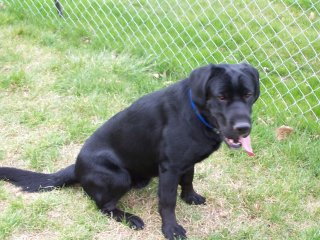 Older pictures generally have more square
proportions than today's snapshots. So the first thing to do is crop
this down from it's 3:2 proportions (4" by 6") to something like 4:3
(320 by 240).
Older pictures generally have more square
proportions than today's snapshots. So the first thing to do is crop
this down from it's 3:2 proportions (4" by 6") to something like 4:3
(320 by 240).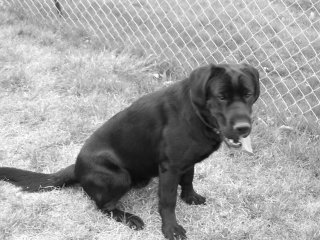 Take the color out of the picture by doing
Image|Mode|Grayscale and then switch it back to Image|Mode|RGB. We want
it back in RGB because we will be shifting the color on it a bit
later.
Take the color out of the picture by doing
Image|Mode|Grayscale and then switch it back to Image|Mode|RGB. We want
it back in RGB because we will be shifting the color on it a bit
later.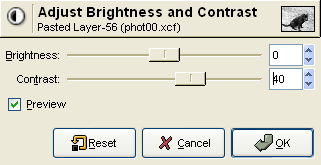 To make pictures look old a lot of people will
add graininess. Looking at old photographs I've found that most of them
are not at all grainy. Even back in the forties most film was pretty
sharp. I have noticed, though, that old pictures tend to have a lot of
contrast. The white areas are really white and the dark areas are really
dark. So ramp up the contrast (Colors|Brightness-Contrast). The
amount will vary from picture to picture, depending on how contrasty it
is to begin with. In this case I added 20.
To make pictures look old a lot of people will
add graininess. Looking at old photographs I've found that most of them
are not at all grainy. Even back in the forties most film was pretty
sharp. I have noticed, though, that old pictures tend to have a lot of
contrast. The white areas are really white and the dark areas are really
dark. So ramp up the contrast (Colors|Brightness-Contrast). The
amount will vary from picture to picture, depending on how contrasty it
is to begin with. In this case I added 20.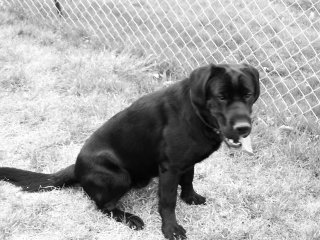 Here is the result after adjusting the
contrast.
Here is the result after adjusting the
contrast. Old cameras with cheap lenses tended to not
distribute light out on the edges of the picture well. Good cameras
didn't have this problem, but I'm going to darken the edges just to add
a bid more oldness to the look. Begin by adding a new layer and filling
it with black. Add a white layer mask (Full Opacity). With the layer mask
selected do Select|All and then Select|Shrink by about 20 pixels
(depending on the size of your image).
Old cameras with cheap lenses tended to not
distribute light out on the edges of the picture well. Good cameras
didn't have this problem, but I'm going to darken the edges just to add
a bid more oldness to the look. Begin by adding a new layer and filling
it with black. Add a white layer mask (Full Opacity). With the layer mask
selected do Select|All and then Select|Shrink by about 20 pixels
(depending on the size of your image).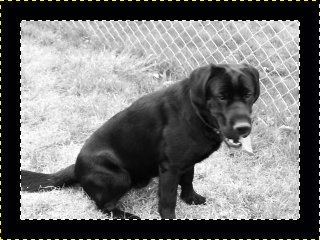 Fill the selection with black.
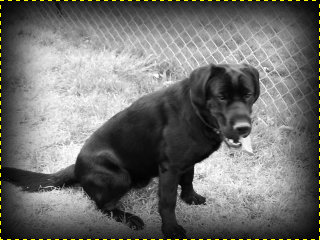 Select|None (Ctrl-Shift-A) and then blur
the layer mask with Filters|Blur|Gaussian Blur. Use a value about
three times the amount you shrank the selection by. In my case that's
60.
Select|None (Ctrl-Shift-A) and then blur
the layer mask with Filters|Blur|Gaussian Blur. Use a value about
three times the amount you shrank the selection by. In my case that's
60. Soften the effect by reducing the opacity of
that layer to about 33%. If you want to include this effect but don't
want to make it look like the camera was just awful, you can shrink by
a smaller number so the black encroaches on less of the picture or
reduce the opacity of the layer even further to make it more faint.
When you have it where you want it, flatten the image.
Soften the effect by reducing the opacity of
that layer to about 33%. If you want to include this effect but don't
want to make it look like the camera was just awful, you can shrink by
a smaller number so the black encroaches on less of the picture or
reduce the opacity of the layer even further to make it more faint.
When you have it where you want it, flatten the image.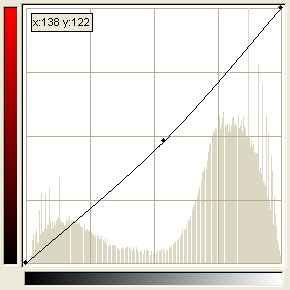 No photograph is perfectly gray, so we'll
shift the color just a bit to make it look more realistic. Open the
curves tool (Colors|Curves). Switch to the curve for red and bend
it down just a bit by adding a point at (138,122).
No photograph is perfectly gray, so we'll
shift the color just a bit to make it look more realistic. Open the
curves tool (Colors|Curves). Switch to the curve for red and bend
it down just a bit by adding a point at (138,122).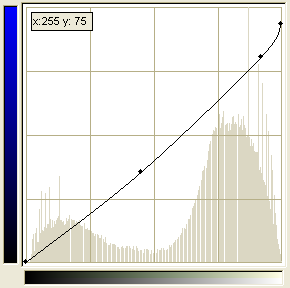 Switch to the blue curve. Bend it by adding
points at (115,90) and (235,205) and sliding the upper end down to
(255,238).
Switch to the blue curve. Bend it by adding
points at (115,90) and (235,205) and sliding the upper end down to
(255,238).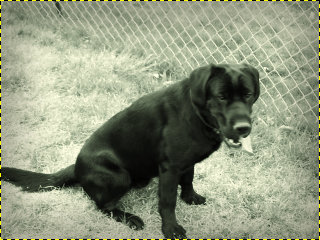 This is the result. Without a true grayscale
to compare it to nobody would guess it had been colored. You're done, and
wasn't it easy? I found that the hardest part was getting my dog to stay
still enough to take his picture.
This is the result. Without a true grayscale
to compare it to nobody would guess it had been colored. You're done, and
wasn't it easy? I found that the hardest part was getting my dog to stay
still enough to take his picture.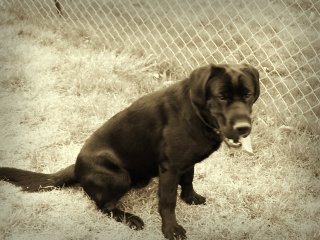 If you want to go for more of a Civil War
era picture then you have to color it significantly with more of a sepia
tone. I do this by adding a point at (120,140) on the red curve and
points at (130,90) and (255,220) on the blue curve. You may also want
to bring out the edge darkening a little more, too.
If you want to go for more of a Civil War
era picture then you have to color it significantly with more of a sepia
tone. I do this by adding a point at (120,140) on the red curve and
points at (130,90) and (255,220) on the blue curve. You may also want
to bring out the edge darkening a little more, too.