
Gimp Tips - Glass
You see a lot of glassy looking logos and designs around these days. Buttons or titles are made to look like they are smooth curved glass. I think it started with Mac OS X. Anyway, It's a pretty cool look so here's a way for you to make your own glassy buttons or other design elements. For a less detailed glass effect that is much quicker and easier, see my instaglass tip.
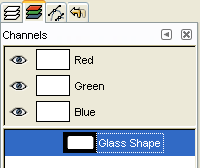 Begin by defining the shape of your glass in a new channel. Rounded
corners help create the smooth curved glassy look.
In 2.4 this is easy. Select the rectangle selection tool, check
"Rounded corners" in the tool options, and select an appropriate radius
(I used about 15). You could
also just create a new channel and paint your shape on it with white.
Begin by defining the shape of your glass in a new channel. Rounded
corners help create the smooth curved glassy look.
In 2.4 this is easy. Select the rectangle selection tool, check
"Rounded corners" in the tool options, and select an appropriate radius
(I used about 15). You could
also just create a new channel and paint your shape on it with white.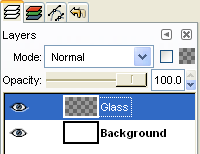 Create a new transparent layer called "Glass" and do Channel to Selection
on your glass shape.
Create a new transparent layer called "Glass" and do Channel to Selection
on your glass shape.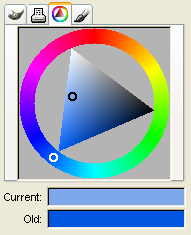 Select the color you want for your glass and a lighter shade of that
color as your foreground and background colors.
Select the color you want for your glass and a lighter shade of that
color as your foreground and background colors. Gradient fill the selection so that the lighter shade is at the bottom
and it transitions to the full color about half way up.
Gradient fill the selection so that the lighter shade is at the bottom
and it transitions to the full color about half way up. Create a new layer on top called "Glint" and fill it with white. Set the
opacity for the layer to about 75%. Add a layer
mask to it with full transparency.
Create a new layer on top called "Glint" and fill it with white. Set the
opacity for the layer to about 75%. Add a layer
mask to it with full transparency.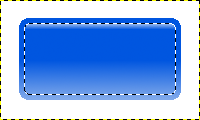 Shrink the selection by about 5 pixels (or about 5% of the glass's overall
size). In the layer mask, gradient fill the selection from white at the very
top down to black just a few pixels lower.
Shrink the selection by about 5 pixels (or about 5% of the glass's overall
size). In the layer mask, gradient fill the selection from white at the very
top down to black just a few pixels lower. Add a layer between "Glass" and "Glint" with whatever you want to appear
on the surface of the glass. I added some text, but it could be an image
or icon, or whatever. This result looks pretty good. You can stop
here if you want, but I'm going to add a few more touches to really make
it look good.
Add a layer between "Glass" and "Glint" with whatever you want to appear
on the surface of the glass. I added some text, but it could be an image
or icon, or whatever. This result looks pretty good. You can stop
here if you want, but I'm going to add a few more touches to really make
it look good. Add a new transparent layer just above "Glass" and call it "Edge". Do
Channel to Selection again and then Select|Invert. Back in the new
layer fill this area with black.
Add a new transparent layer just above "Glass" and call it "Edge". Do
Channel to Selection again and then Select|Invert. Back in the new
layer fill this area with black. Select|None (Ctrl-Shift-A) then Filters|Blur|Gaussian Blur by about
10 (depending on how big your image is, of course).
Select|None (Ctrl-Shift-A) then Filters|Blur|Gaussian Blur by about
10 (depending on how big your image is, of course). Add a layer mask to this layer with full transparency. Channel to Selection
again and in the layer mask fill with white. Set the opacity for the
layer to about 75%.
Add a layer mask to this layer with full transparency. Channel to Selection
again and in the layer mask fill with white. Set the opacity for the
layer to about 75%. Add a new transparent layer between the background and the "Glass" layer.
Call this layer "Shadow". Channel to Selection again and fill that area
on the new layer with black. Select|None (Ctrl-Shift-A) and
Filters|Blur|Gaussian Blur by about 5.
Add a new transparent layer between the background and the "Glass" layer.
Call this layer "Shadow". Channel to Selection again and fill that area
on the new layer with black. Select|None (Ctrl-Shift-A) and
Filters|Blur|Gaussian Blur by about 5. Move the "Shadow" layer down and to the right a bit and then set its
opacity to around 40%. There you go! Beautiful glassworks from your
computer.
Move the "Shadow" layer down and to the right a bit and then set its
opacity to around 40%. There you go! Beautiful glassworks from your
computer.